How to Cosplay: Making a Japanese Gi
Well a lot of you complained that you can’t find this article on my Yam blog. So I’m shifting it here to T.C.C
This article shall focus on making a Japanese Gi top(think Kenshin and Bleach) the simplest way. Readers are advised to gauge for themselves how suitable this method is for their costume and fabric.
1) Before you start drawing and cutting on the fabric, leave aside enough cloth for the collar.
Collar cloth = 4” width x ( 2.25 x length of Gi)
It doesn't matter if the cloth is not long enough; just sew 2 pieces of cloth together at their ends to form the needed length.
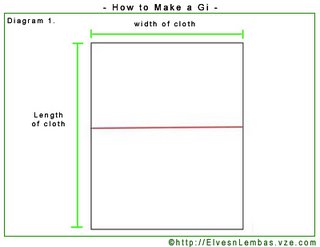
2) Fold the remaining cloth in half and it will form the imaginary red line in the middle.
3) [Diagram 02]

Use a tailor chalk and draw lines like the red ones on the now folded halve of your cloth. Make sure the lines are symmetrical.
*Tip: folding the cloth vertically in halves again will give u an accurate middle line without the need for rulers.
a. The orange lines are places where you should make booth side of the sleeves equal
b. The green line is your shoulder length. The few inches of extra allowance given will contribute to your sleeve lengths and chest width. This few inch is necessary. You will need them to allow your Gi to overlap!
c. The purple line is the length of your arm hole (albeit divided in 2). Japanese Gi are usually quite roomy so I would suggest leaving at least 7 inches of arm hole. If in doubt, look at your normal day shirt and measure it, or just measure the circumference of your upper arm. Be careful with this portion, its better to give more than less, you wouldn't want your arm to be stuck there .
4) [Diagram 03]

a. The blue line is the length of your chest (divided by 2), give allowance. If you've noticed, this chest area sort of follows the shoulder measurements. What you can do is follow the length of your shoulders + a few extra inches of allowance for your chest. BUT, if your chest measurement is bigger than 2 x shoulders, let the shoulders follow your chest measurement instead.
b. The semicircle will be your neckline. The green line is approximately 1“, add more inches if your costume design needs a lower neckline.
c. The pink line at the bottom should be a few inches wider than the blue line. You will be relying on thes extra inches to overlap your Gi when its completed so don’t be too stingy with the allowance. As a warning, if you intend to make the sleeves as long as your gi, then the extra allowance will eat away the sleeves’ bottom width.
5) [Diagram 04]

Cut along the dotted line. Cut BOTH CLOTH for the red lines, meaning both the back and front cloth are to be cut. Cut ONLY the front cloth for the green line. That will be the opening of your Gi.
6) [Diagram 05]
 Now that you've cut the red lines, cut along the blue dotted lines. Try to make a nice gradual downward curve.
7) [Diagram 06]

Bring out your collar cloth and iron the patterned areas faced down like Diagram 07. Make sure the bottom of the cloth is jutting out slightly more than the cloth above.
8) Iron the whole piece of cloth and keep it halves like Diagram 08.
9) It is highly recommended that you interlock the edges of the fabric so the final costume won't fray or tear so easily.
10) You are ready to start sewing! Remember, you don’t sew on the surface of your costume so turn your fabric inside out and sew on the insides.
11) [Diagram 09]

Start by sewing along the red dotted lines. Leave around 0.5” of space between the edge of the cloth and the stitch line.
12) [Diagram 10]

If your sewing was correct, the fabric should look like this.
13) [Diagram 11]
 Fold the edges of the sleeves in by around 0.5” or 1” to create the hem. Now sew the hem line.
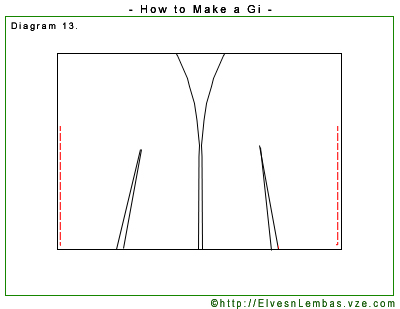
14) [Diagram 12]

If your gi needs a pocket like sleeves, then sew along the blue dotted lines

Otherwise, just sew the red lines in Diagram 13.
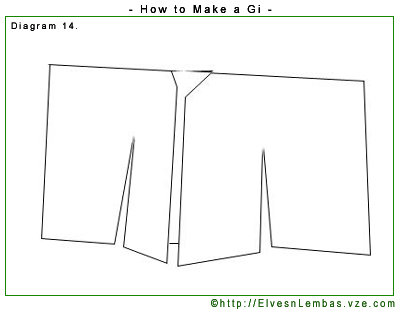
15) [Diagram 14]

You should get something like this.
16) [Diagram 15]
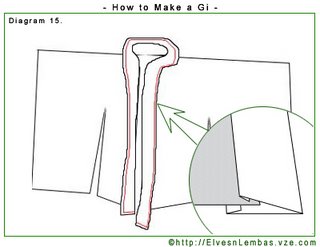
Now for the collars. Use pins to secure it to the gi top
17) [diagram 16]

Tuck in the ends of the collar cloth and pin it down to give your collar a nice finish at the ends. Start sewing it along the red lines. Now just sew in all the exposed edges below the gi and you're done!
This article shall focus on making a Japanese Gi top(think Kenshin and Bleach) the simplest way. Readers are advised to gauge for themselves how suitable this method is for their costume and fabric.
Material Adequate amount of cloth ( see below ) Tools Fabric Scissors Fabric Chalk Sewing Machine Pins
Width of fabric = (sleeves length x 2) + shoulder width + a negotiable 2 or 3 inches + 2” (hems on both sleeves) *Fabric width usually comes in standard sizes like 38”, 45” and 60”. Make sure to ask the store owner before you buy! * How loose the Gi turn out to be will depend on how much allowance you give to the ‘negotiable 2 or 3 inch’ Length of fabric = (how long you want the gi to be) x 2 + 2” (hems on ends of Gi) *always remember to leave extra cloth for hemmings! Example: For a petite asian girl like me who have 15” shoulders, I would need around 3yards of 40” width fabric. The outcome would be a semi loose Gi top with around 10.5” sleeve length. |
INSTRUCTIONS
1) Before you start drawing and cutting on the fabric, leave aside enough cloth for the collar.
Collar cloth = 4” width x ( 2.25 x length of Gi)
It doesn't matter if the cloth is not long enough; just sew 2 pieces of cloth together at their ends to form the needed length.
2) Fold the remaining cloth in half and it will form the imaginary red line in the middle.
3) [Diagram 02]

Use a tailor chalk and draw lines like the red ones on the now folded halve of your cloth. Make sure the lines are symmetrical.
*Tip: folding the cloth vertically in halves again will give u an accurate middle line without the need for rulers.
a. The orange lines are places where you should make booth side of the sleeves equal
b. The green line is your shoulder length. The few inches of extra allowance given will contribute to your sleeve lengths and chest width. This few inch is necessary. You will need them to allow your Gi to overlap!
c. The purple line is the length of your arm hole (albeit divided in 2). Japanese Gi are usually quite roomy so I would suggest leaving at least 7 inches of arm hole. If in doubt, look at your normal day shirt and measure it, or just measure the circumference of your upper arm. Be careful with this portion, its better to give more than less, you wouldn't want your arm to be stuck there .
4) [Diagram 03]
a. The blue line is the length of your chest (divided by 2), give allowance. If you've noticed, this chest area sort of follows the shoulder measurements. What you can do is follow the length of your shoulders + a few extra inches of allowance for your chest. BUT, if your chest measurement is bigger than 2 x shoulders, let the shoulders follow your chest measurement instead.
b. The semicircle will be your neckline. The green line is approximately 1“, add more inches if your costume design needs a lower neckline.
c. The pink line at the bottom should be a few inches wider than the blue line. You will be relying on thes extra inches to overlap your Gi when its completed so don’t be too stingy with the allowance. As a warning, if you intend to make the sleeves as long as your gi, then the extra allowance will eat away the sleeves’ bottom width.
5) [Diagram 04]
Cut along the dotted line. Cut BOTH CLOTH for the red lines, meaning both the back and front cloth are to be cut. Cut ONLY the front cloth for the green line. That will be the opening of your Gi.
6) [Diagram 05]
Now that you've cut the red lines, cut along the blue dotted lines. Try to make a nice gradual downward curve. 7) [Diagram 06]
Bring out your collar cloth and iron the patterned areas faced down like Diagram 07. Make sure the bottom of the cloth is jutting out slightly more than the cloth above.
8) Iron the whole piece of cloth and keep it halves like Diagram 08.
9) It is highly recommended that you interlock the edges of the fabric so the final costume won't fray or tear so easily.
10) You are ready to start sewing! Remember, you don’t sew on the surface of your costume so turn your fabric inside out and sew on the insides.
11) [Diagram 09]
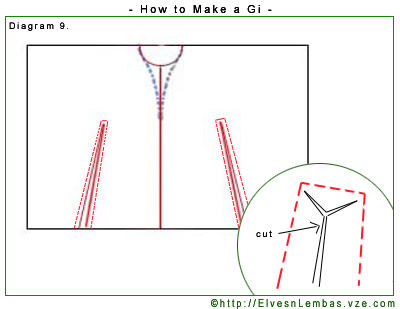
Start by sewing along the red dotted lines. Leave around 0.5” of space between the edge of the cloth and the stitch line.
12) [Diagram 10]
If your sewing was correct, the fabric should look like this.
13) [Diagram 11]
Fold the edges of the sleeves in by around 0.5” or 1” to create the hem. Now sew the hem line. 14) [Diagram 12]
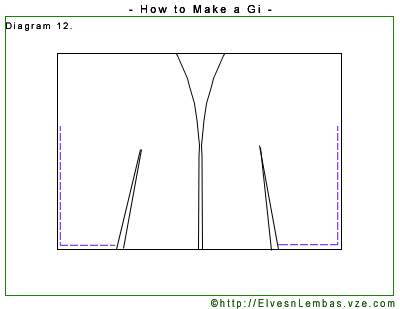
If your gi needs a pocket like sleeves, then sew along the blue dotted lines
Otherwise, just sew the red lines in Diagram 13.
15) [Diagram 14]
You should get something like this.
16) [Diagram 15]

Now for the collars. Use pins to secure it to the gi top
17) [diagram 16]

Tuck in the ends of the collar cloth and pin it down to give your collar a nice finish at the ends. Start sewing it along the red lines. Now just sew in all the exposed edges below the gi and you're done!


Comments
Maybe you can try doing 2 piece clothing for the top. One, a normal gi, another a sleeveless crew neck thingy.
Either that or you can just use this tutorial for the sleeves and body portion. Do something creative with the collar to get your desired effect. =)
This is an AMAZING tutorial! It's so easy as well, thankyou so much!
thank you so much!
muchas gracias ♥
Ignore the comment I posted before ^ ^
If my interpretation of bunching is the same as yours (scrunched up cloth). Then that is usually a 'tension' problem in the sewing department. Either adjust your sewing machine's bobby tension, hand sew or try not to pull the cloth (whichever side that's NOT bunching) too much.
The cloth used also effects the outcome. Heavy cloth will help weight the collar down.
I was wondering, is it possible to use this to make a haori?
Or are there any major (or minor) modifications necessary?
Thanks again for a wonderful tutorial!
Tips?
Thank You :)